Video Editing in Adobe Photoshop CC
I have been working with Adobe Photoshop since CS4 and am always amazed at how much it will do. There are hidden little gems of capability lurking everywhere in the program, and occasionally I will get to know another one and then incorporate into my editing arsenal. This one, though, is a huge capability that I never knew existed in the program. It can do video editing—and not just the basic stuff. It can fade video in and out, fade pictures into the video where and when you want them, add type where and when you want it, as well as add audio and make it all flow seamlessly. It’s all done using the existing layers capability where each track is another layer. The editor looks like this:

For an example of what can be done, see this drone/beach shoot video I posted on YouTube. I learned a lot about video editing making this video:
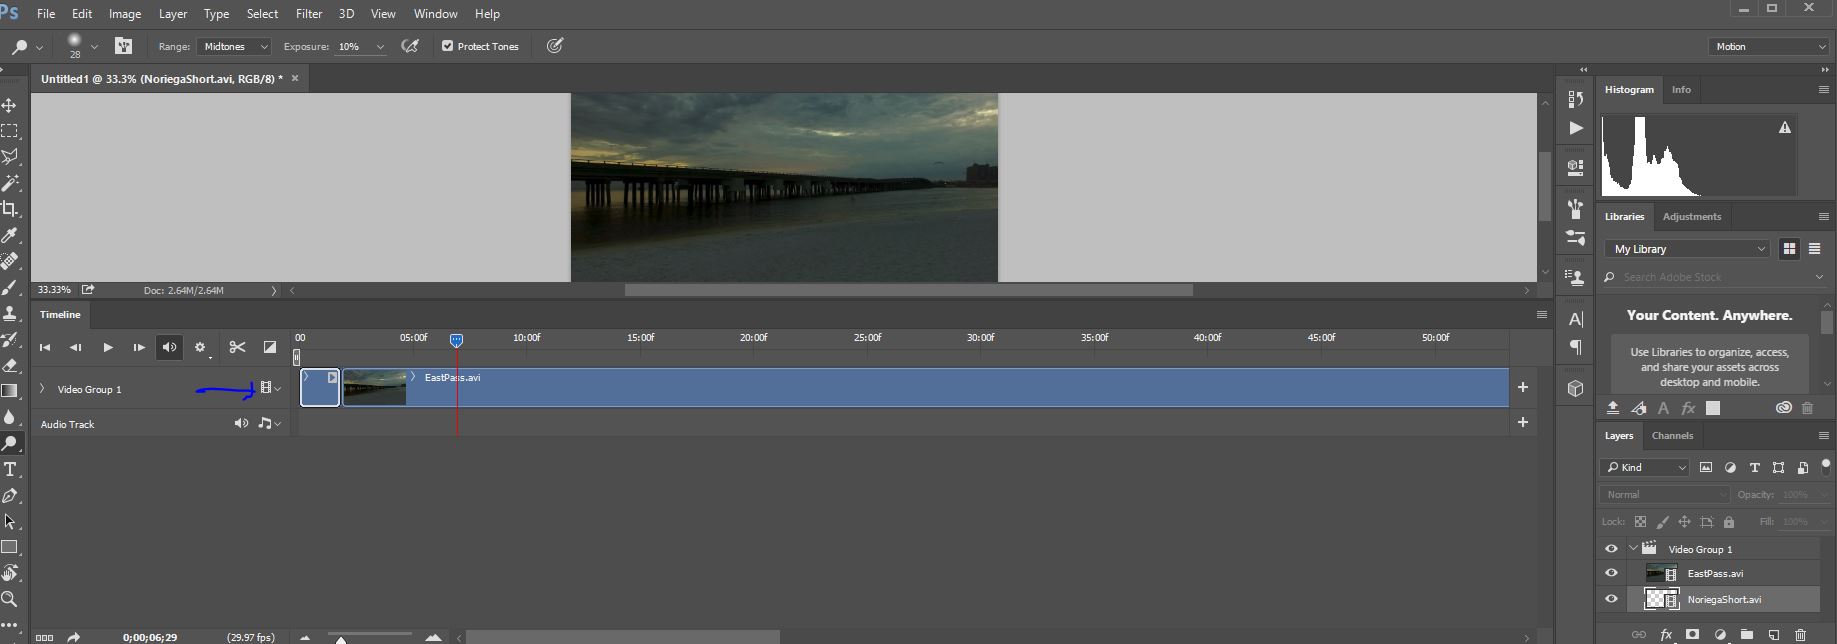
The video editing workspace is cleverly hidden and is accessed by going to the workspace button at the top right corner of the screen and clicking on the word Motion (the blue arrow in the picture above).
This brings up the layers palette on the right, the viewing area in the middle, and the video stream editing panel on the bottom. All the magic will take place at the bottom of the screen.
First, though, you have to gather whatever video files you want to edit. Most of my video files are taken with a drone. Stick what you want to work with in a separate folder and then go to File>Scripts>Load files into stack. That brings up a window allowing you to browse to your folder and select the two or more files you want to load. You can add other files later if you want, but I find it best to get it all together at the start.

Hit OK and the files are loaded into separate layers.
This may take a while depending on how big the files are. Once it’s loaded it will look like this:

Your video files are loaded as layers in the layer palette on the right, as stacked lines in the video editing panel on the bottom, and a picture shows up in the viewing area.
Next to each video clip in the editing panel is a little film strip with an arrow by it. Make sure all the layers are selected, then hit that top film strip thing and select New video group from clips. This will incorporate your clips into one video group running sequentially, instead of consecutively. It’ll look something like this:
The clips are now sequential under a new video group. On the bottom editing panel, there is a little blue pentagon with dots in it. Dragging that to the right will pan through your video clips. It’s a very important tool. Over on the left are controls that can move it. Press the little play arrow and the blue pentagon moves across the screen while your video plays in the viewing window like magic. Press the stop button and it stops. Press the little |> or <| buttons and you can step from frame to frame, handy for pinpointing where you want the video to be. There is also a little scissors button. Hit that and you snip the clip into two clips at the point where the blue pentagon is located, like so:
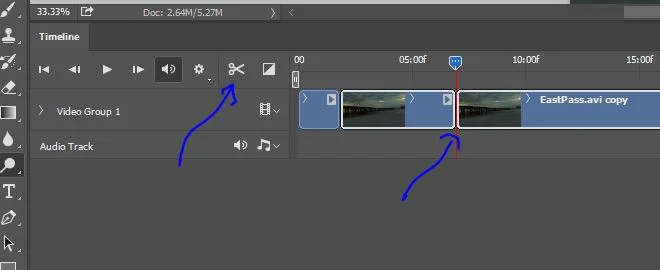
Using this set of tools, you can snip out portions of the clips you want to discard. Select the clip to be discarded and it will be highlighted in the layers palette. Drag it to the trashcan and it’s gone, just like any other layer. One of the nice things about digital is you don’t have to wade through the piles of discarded film on the cutting room floor, and no tape is needed to put the film back together after your snip. If you want to move clips around, select them and then use the mouse to drag them to where you want them.
There is also a little transition button for fading in and out with five options to choose from.

This allows you to do pretty cool stuff, like fading in from black, or fading out to white. You can also control the length of the fade. A “cross fade” will do both a fade-out on one clip and a fade-in on the next.
That little inclined plane at the front of a clip is your fade-in. If it is on the back of a clip, it's a fade-out. You can also select it and extend or shorten it. Pretty cool stuff.
Remember to save your work from time to time. This is done just like with any Photoshop file by using the File>Save As button. Your work will be saved as a PSD file. When you’re done, you want to “render” your video. This is done under the little box on the top right of the editing panel.

Which brings up this screen:
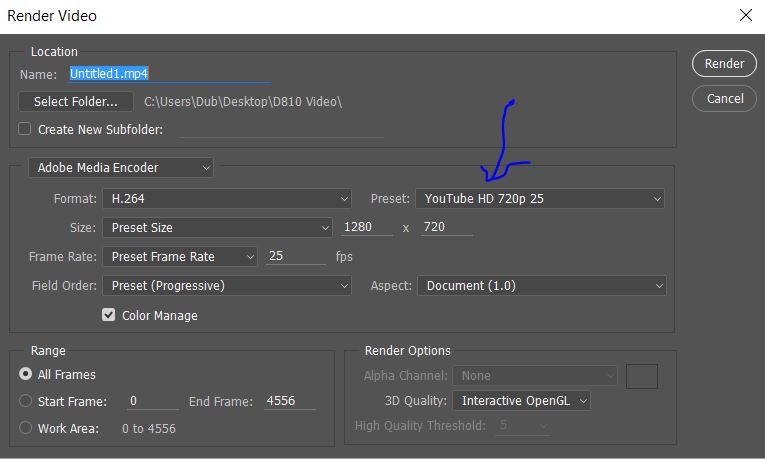
You can put in your title, select where to save and there are a whole mess of presets you can use for how you want it formatted. These are located under the Preset: arrow. I selected YouTube HD 720p 25. Once you have it all how you want it, hit Render and the computer will go to work creating your video.
Next time, I’ll go into detail on adding things like titles, audio, inserting still shots, fading them in and out, and the use of layer transparency to do some pretty fun stuff. Enjoy.